In a nutshell
- 🎯 Stretch a rubber band vertically across a paint can to create a central squeegee that strips excess paint instantly, reducing drips and mess.
- 🛡️ Keeps the rim pristine and the lid sealing cleanly, preventing clogged channels and preserving paint for longer, hassle-free storage.
- 🧰 Step-by-step: pick a wide, taut band; dip bristles one-third to halfway; wipe both faces lightly on the band; park the brush on the band between strokes; use silicone for solvent-based paints.
- ⚖️ Compared with rim-wiping and trays, the band is fast, cheap, and tidy; ideal for cutting-in and small to medium rooms, with the caveat that bands can slip or degrade with solvents.
- 💡 Pro tips: cross bands for big tins, keep the can exterior dry, avoid heavy pressure on bristles, and store bands away from sunlight for smoother loading, sharper lines, and quicker clean-up.
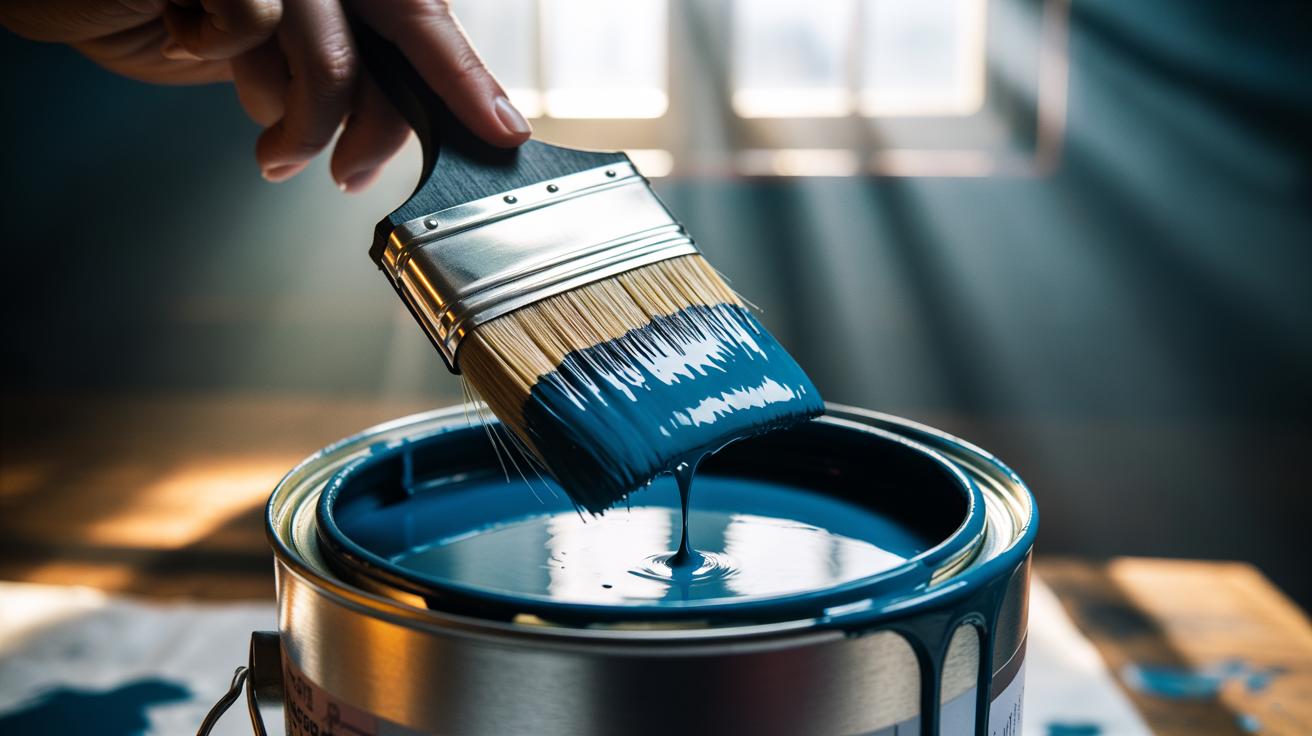
A simple hack, used by decorators from Brighton to Belfast, can turn a messy paint session into a tidy one in seconds. Stretch a rubber band vertically across the open mouth of a paint can, and you’ve created a clean, central “squeegee” for the bristles. Dip, wipe, and the excess paint returns to the tin instead of pooling on the rim or dripping to the floor. It’s inexpensive, repeatable, and brilliantly quick. Because the brush is wiped on a tensioned band rather than the metal lip, you avoid rim build-up that causes sticky lids and rogue drips later. Expect cleaner lines, fewer splashes, and a calmer end-of-day clean-up.
Why a Rubber Band Works as a Paint Squeegee
When a loaded brush leaves the tin, gravity takes over. Paint travels down the ferrule and onto your fingers, the handle, then your floorboards. The fix is to remove the surplus before you move. The tensioned rubber band offers a flexible wiping edge, centred above the liquid, so the fluid shear forces strip just enough paint from the bristles without deforming them. That balance matters. Too much pressure, and you starve the brush; too little, and the drips keep coming.
Wiping on the can’s metal rim is the old habit, but it invites trouble: grooves fill with paint, lids refuse to seal, and flakes chip into your finish next time you pry it open. The vertical band delivers a clean line straight back into the paint can, keeping the rim pristine. This small change prevents the cascade of mess that starts with a clogged channel and ends with a welded-on lid.
There’s a physics kicker too. A rubber surface has a touch of “give,” which spreads force and protects bristle tips, while the narrow contact line reduces capillary hold, encouraging the excess to fall back where it belongs. The result is smoother loading, better control, and fewer wipe-backs on the wall.
Step-by-Step: Wrap, Wipe, and Paint Cleaner
First, choose a strong, wide rubber band—something akin to a postie’s red band. For a 2.5-litre tin, one broad loop usually suffices; for larger 5-litre tubs, cross two bands for stability. Ensure the band lies taut across the centre of the opening, running vertically from top to bottom, not diagonally. Hook it under the base and over the opposite rim so it stays put when wet.
Open the paint can carefully, protecting the channel. Stir thoroughly. Dip the brush only one-third to halfway into the paint. Lift slowly. Now wipe each face of the bristles on the band with a light, even stroke. Hear the faint squeak? That’s the right pressure. Rotate the brush, repeat, and watch the surplus fall straight back into the tin instead of pooling on the lip.
Paint steadily. Reload often rather than overloading once. If the band slides, dry the outside of the can and reposition; a clean surface improves grip. For oil-based paints, switch to a silicone band or an elastic strap—solvents can degrade natural rubber. When you pause, park the brush across the band so the bristles are suspended, not crushed against the rim. This keeps the brush shape true and prevents a gummy heel.
How the Rubber Band Trick Compares to Common Methods
Plenty of decorators still wipe on the rim out of habit, then blame drips on cheap tools. Others decant into a tray with a grid, which is tidy yet slower for cutting-in. The vertical band sits between these approaches: it’s as fast as rim-wiping but nearly as clean as a grid. It also preserves the can rim integrity, which pays off the next time you reseal and store half a litre for touch-ups. Below, a quick comparison to help you choose your workflow on any given job.
| Method | Pros | Cons | Best For |
|---|---|---|---|
| Rubber band on can | Fast, cheap, keeps rim clean | Band can slip; rubber may degrade with solvents | Cutting-in, small to medium rooms |
| Wipe on rim | No extra kit needed | Clogs channel, messy drips, hard-to-close lid | Emergency touch-ups only |
| Tray + grid | Very clean loading, great control | Extra washing, more decanting time | Rolling and large walls |
| Clip-on pour spout | Clean pours, protects rim | Another gadget to clean/store | Mixing, decanting, multi-colour jobs |
If speed and cleanliness both matter, the band is the sweet spot: minimal setup, maximum impact. For long sessions, pair it with a liner or spout to keep the entire system tidy, from pour to final wipe. The hybrid approach saves time now and grief later.
Pro Tips, Variations, and Mistakes to Avoid
Pick a band with width. Narrow bands cut into bristles and leave tell-tale ridges. A 10–15 mm band spreads pressure so your brush keeps a fine edge for cutting-in. For large tins, cross two bands in an “X” and wipe on the centre where the tension is highest. If your project runs several days, swap to a silicone or fabric-coated elastic that shrugs off solvents and won’t perish overnight.
Never wipe on the rim once the band is on; keep that channel pristine so the lid reseals airtight and your paint stores months longer. If you spot paint skin forming, lift and discard it before it snags on the band. When wiping, use light, repeatable strokes—pressing hard only starves the brush and scuffs the ferrule. Keep a rag handy to dry the can’s exterior; a dry shell means a band that doesn’t creep.
Got oil-based undercoat? Test the band first, or wrap the contact point with a loop of masking tape to add friction and protect the rubber. Clean-up is easy: peel the band, scrape any residue back into the paint can, and rinse if compatible. Store bands flat, away from sunlight. The goal is simple: controlled loading, fewer drips, and a brush that paints rather than fights you.
One elastic loop, one tidier day’s work. The vertical-band wipe gives you cleaner fingers, a spotless rim, and a brush that lays paint exactly where you aim it. You’ll spend less time scrubbing skirting boards and more time admiring sharp lines and even sheen. Try it on your next feature wall or skirting refresh, then experiment with silicone bands, crossed bands, or a spout-and-band combo for bigger rooms. What surface will you transform first with this small but mighty switch in technique?
Did you like it?4.7/5 (22)