In a nutshell
- 🔥 Foil acts as instant insulation, smoothing heat distribution by moderating conduction, convection, and reflecting radiant energy thanks to its low emissivity.
- 🛠️ Practical fixes include a foil tent for roasts, a crust collar for pies, double-sheeting for biscuits, and a side baffle—delivering targeted heat control without changing oven temperature.
- ⚡ Speed method: fold a shiny panel, place it over, under, or beside hot spots, rotate the tray, and watch colour stabilise—your DIY heat baffle works within minutes.
- ⚠️ Safety: never line the oven floor, keep foil clear of elements, don’t use in microwaves, and buffer very acidic/salty foods—treat foil as a movable wall, not a seal.
- ♻️ Sustainability: reuse heavy-duty sheets (widely recyclable in the UK) and pair with silicone mats, stones, or parchment; adapt techniques to fan, gas, and air-fryer quirks, guided by visual cues.
We think of kitchen foil as a wrapper or a lid. But its most surprising trick is as an instant insulation tool that evens out heat distribution in seconds. By reshaping a sheet of aluminium foil into a reflector, baffle, or spacer, you can correct hot spots, tame aggressive browning, and keep delicate edges safe while the centre cooks through. It’s lightweight, cheap, endlessly adaptable. In a busy weeknight kitchen, that matters. A quick fold or loose tent can transform an unpredictable oven into a steadier, kinder heat source without changing the temperature dial. Here’s how and why it works—and the smart ways to use it today.
Why Foil Works as Instant Insulation
Kitchen foil (aluminium, not tin) tackles the three ways heat moves: conduction, convection, and radiation. Pressed between a tray and food, it becomes a thin barrier to conduction, slowing the rush of heat into the base of biscuits or fish. Shaped as a tent or collar, it corrals and moderates convection, keeping steam where you need tenderness and preventing turbulent hot air from blasting the surface. Most powerfully, foil’s low emissivity means it reflects a large chunk of radiant heat away from vulnerable areas, like pie edges that darken too quickly.
Insulation is not just about thickness. It’s also about air. A crumpled or loosely folded sheet traps tiny pockets of air, which are poor conductors. That micro-cushion can be the difference between scorch and shine. Shiny versus dull side? The effect is marginal in home ovens; focus instead on placement and shape. What makes foil remarkable is speed: a strategic shield or spacer can rebalance heat exposure in under a minute, right in the middle of a bake.
This is why pros “tent” roasts, “collar” cakes, and “double-sheet” cookies. You are not lowering oven temperature; you’re redistributing how it arrives. The result: calmer edges, thorough centres, juicier textures. And because foil is malleable, you can adapt it to the quirks of your kit—gas ovens with fierce side heat, compact air fryers, or toaster ovens that brown unevenly.
Practical Kitchen Uses to Fix Hot Spots
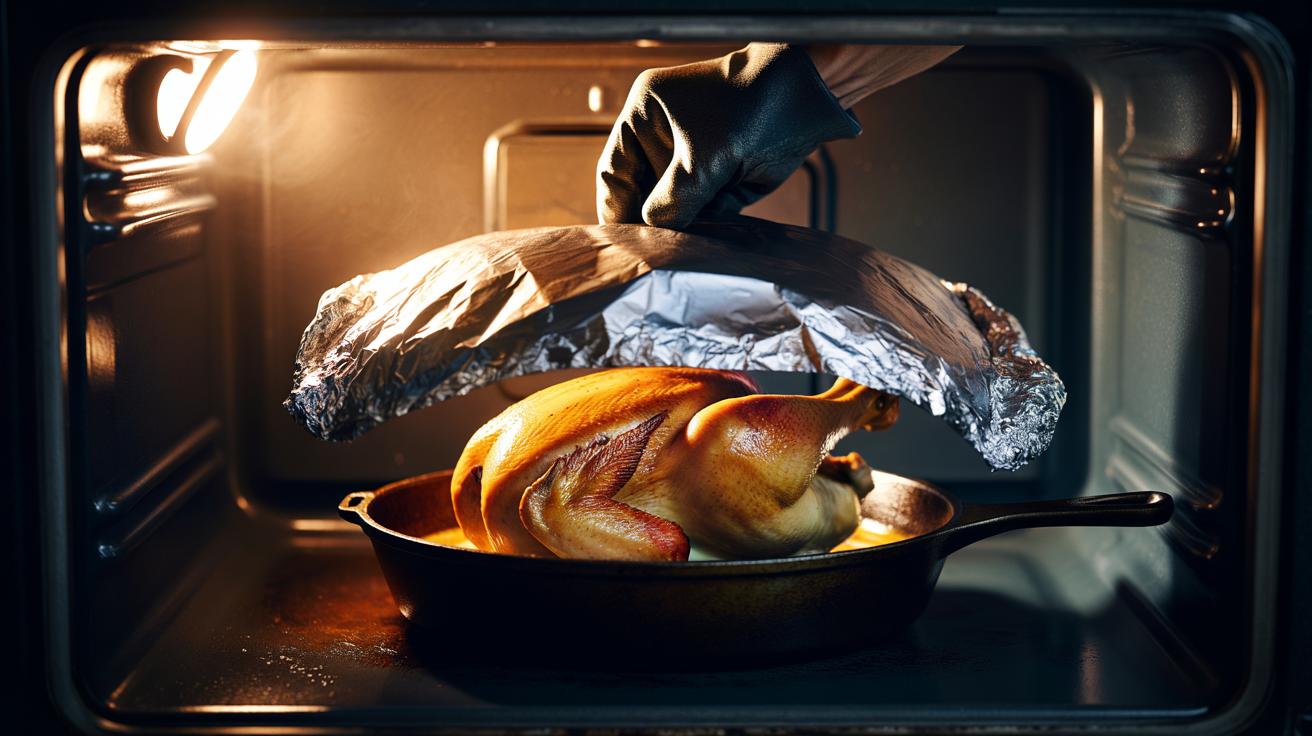
Think of foil as a precision tool. For roasting, a loose foil tent over chicken or beef prevents the exterior from racing ahead of the core temperature. For baking, a pie crust collar—a simple ring of foil around the rim—shields edges so the centre sets without bitterness. Traybakes? Slide a relaxed sheet of foil under a thin tin to create a mild insulating layer that stops sugary vegetables from burning before they caramelise. These small interventions reclaim control in ovens that run hot or brown unevenly.
When reheating, a makeshift lid of foil traps steam and restores suppleness in rice and pasta bakes. For delicate fish, perch the fillet on a foil “raft” to soften bottom heat while letting the top receive gentle radiation. And for biscuits or cookies, double-sheeting—placing your baking tray atop a second tray with a loose foil in between—smooths out conductive spikes that cause over-browned bases.
Use this quick guide to match technique to task.
| Technique | Best For | How It Insulates | Time Saving |
|---|---|---|---|
| Foil Tent | Roasts, whole fish | Reflects radiant heat; traps gentle steam | Works within 30–60 seconds |
| Crust Collar | Pies, quiches | Shields edges from over-browning | No temperature change needed |
| Double-Sheeting | Biscuits, pastries | Air gap slows conduction | Prevents burnt bases fast |
| Side Baffle | Ovens with side hot spots | Reflects lateral radiant heat | Immediate rebalancing |
| Makeshift Lid | Reheating rice, pasta bakes | Captures moisture; moderates convection | Soft results in minutes |
A Speedy Method for Pans, Trays, and Ovens
Try this simple routine when something is colouring too quickly. Step 1: fold a sheet of foil into a loose panel, shiny side facing the heat source. Step 2: position it where the problem is worst—over the top for fierce browning, around the sides for lateral heat, or beneath the tray for hot-base issues. Step 3: give the food a quick rotation, then watch for the colour to stabilise. Most home ovens show improvement within the next minute or two, without touching the thermostat.
For traybakes, stack a second, inverted tray under the first with a relaxed foil in between—your DIY heat baffle. For pies, shape a rim-only collar that leaves the centre exposed. For a roast, tent the joint but leave a small gap for steam to escape, keeping skin crisp. With fish, start uncovered for colour, then add a soft foil canopy to finish gently. The principle is the same: block where heat is excessive; allow exposure where it lags.
Safety matters. Never line the oven floor—it blocks airflow and can damage the appliance. Keep foil clear of electric elements and never use it in a microwave. Avoid prolonged direct contact with very acidic or salty foods if you’re concerned about metallic flavours; use parchment as a buffer. Think of foil as a movable wall, not a full seal: you’re shaping heat, not suffocating it. With practice, you’ll spend less time fiddling with temperatures and more time nailing texture.
Safety, Sustainability, and Smart Alternatives
Foil is powerful, but use it thoughtfully. Choose heavy-duty sheets for reusable shields and wash gently to extend life; clean, dry aluminium is widely recyclable in the UK. For frequent baking, combine foil intermittently with a silicone mat or a preheated pizza stone to add thermal mass and reduce spiky heat flux. Parchment remains a superb non-stick layer; together with a foil baffle, it tames both conduction and radiation without smothering airflow.
Consider your appliance. Fan ovens blast convection; position foil to break the gust, not the circulation. Gas ovens often have hotter sides; create a narrow foil side baffle clipped to the rack, not the walls. Air fryers? A small foil tent can protect tops from the fan’s intensity, provided vents stay open. Good insulation is targeted, breathable, and reversible. That’s the beauty of foil: you can remove it the moment the balance is right, restoring crispness on demand.
Finally, trust your eyes. Colour is your readout. If edges outrun the centre, insulate the edges. If the base is dark, buffer below. If the top lags, remove the shield. With a few folds and a little patience, you’ll steer heat exactly where it’s needed.
In a cost-conscious kitchen, the ability to move heat without changing the temperature is a gift. A sheet of aluminium foil, folded with intent, becomes a flexible tool for smoother heat distribution, calmer browning, and juicier results. It doesn’t take new gear. Just awareness of where energy is arriving too hard or too fast, and a willingness to place a simple reflector in its way. Once you try it, you’ll see the difference within minutes, sometimes seconds. Where will you use your first foil shield—over a roast, around a pie, or beneath a tray of biscuits?
Did you like it?4.5/5 (25)